Sunday, July 15, 2012

Altered Paper Doll


 In the, In My Vintage Room and Beyond Art Group I am hosting a swap called Altered Paper Dolls where you design your own doll and dress her.  The idea is that you start with a base doll  from a picture or a template found on the Internet a magazine, or stamped image or one you drew yourself.  Next you dressed her, there were no rules here.  Basically the only rule was she had to be between 6" and 12" and on a sturdy card stock or chipboard and have fun with it.

Here is my Altered Paper Doll

To make her I started with stamps that I purchased from Character Construct
(Love these stamps by the way for creating dolls.) I stamped the upper half of the doll twice, once on heavy card stock and once on chipboard.  I then cut one of the image apart to make a pattern so I could cut her blouse out, slightly larger than needed to put some padding under her sleeves to give them dimension. Once the blouse was done it was just a matter of what I was going to use to make her skirt. What I did was rip some pattered papers inked the torn edges wrapped them around a pencil to curl them and started gluing in place adding some cotton lace for more texture where I thought it was need, and filled in with the empty places with patterned paper. Her hair is made from mohair (left over from a felting project) that I braided and glued on. Then I just added a few pearls and ribbons, and trinkets and made her a purse and she was done.
I did add one last trinket, and that was the pin on her skirt, because I could hear my grandmothers voice in the back of my head saying Doe Doe a lady always has a safety pin pinned in the folds of her skirt for emergency's.


Stamp sets from Character Construct used:
Mannequin Cafe Collection #14 - Head and Torso
French Laundry #6 -  Skirt
Mad Tea Party Collection # 8 - feet

Ribbon on blouse and purse:  BoBunny Wraps (Holly Berry)
Crocheted Lace is from My Mind's Eye.
The round disk and the pin are from Tim Holtz's

Thanks Gram and Aunt Ann for teaching me to sew when I was a little girl.  Love and miss you both.

Sunday, July 8, 2012

Graphic 45 Little Darlings


My neice Melissa  friend Sharon asked if I would make her a  a baby album for her first grandchild.
Since I was already in possession of the New Graphic 45 paper collection Little Darlings
it was a gven as to what papers I would I would use.

Only thing I had to decide is what type of album I would make. I really enjoy making
these chipboard albums, so this one is a 6" x 12" with the binding on the left side.


 There's a little vellum pocket enevelope, for a little keepsake on this page.


I decided to make a flip book on this page for journaling.


What's really nice about Graphic 45 paper lines is that everything is coordinated,
which it makes it so easy embellish.


I didn't do anything to this page it's just to pretty to cover .


Sharon thanks for thinking of me.
Enjoy the Album.

Materials used:  Graphic 45 Little Darlings Papers and embellishments
Chipboard & Prima Flowers.
Fibers.


Thursday, July 5, 2012

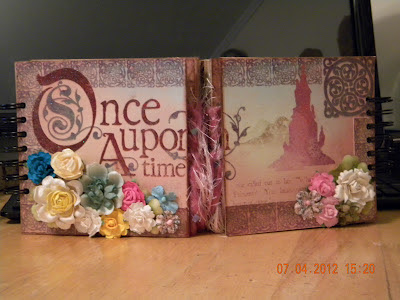
Once Upon a Time Album

From my paper collection I pulled a paper-stack from DCWV called ONCE UPON A TIME.
Having  purchased this paper awhile ago not knowing exactly what I would do with it right then, but loved it and knew I had to have it. I also knew that I would one day find the perfect project to use it.   Well, I finally found that perfect project for my paper-stack.

 My cousin Jermery has two beatiful little girls that he calls his princess's.  So I decided to honor Princess Lily and Princess Fiona
with my storybook ONCE UPON A TIME papers.


I choose to make this album with a 6" x 12" layout using chipboard.  But I did put a little twist to it by having it open in the center, so I cut all but the back cover 6" x 6" and did a wire binding with my chinch on both sides.  This gave me  a 24" layout.  Plenty of room for all of the Princess's pictures.


Having plenty of room for pitcures I decided to cut them out and make a collage with them since I had quite a few I wanted to use.


I used the left side of the album to focus on Princess Lily trying to show  her personality,

  
while using the right side to do the same for Princess Fiona's .
 I love that there were pictures of the girls in their princess gowns and of each of them with a Unicorn how perfect.

 I also put a 6" x 6" Clear Craft Plastic sheet from Recollections between each page to help protect the pictures from sticking.
and to do a little journaling on them with a fine point Sharpe marker,

                      
                              Daddy and the Princess's                           .


   .                         

This was a fun page, because with every princess comes the Knight in Shinning Armor, if you look
carefully you will see him riding up on his horse.


Well maybe not exactly a white horse, but their daddy (the Knight) does drive a #23 Orange Race Car. (Way better....).
Sir Jermery's biggest fans, Princess Lily and Princess Fiona.


Of course we can't forget about Mommy and her Princess's.

And I couldn't resist putting in some Halloween pictures.

 
My cousin Jermery and his wife Jennifer made a fantasic Alice and the Mad Hatter.
Lovin it.

Just more of Princess Lilly and Princess Fiona doing what they do best.
Girls Just Wanta Have Fun.


And the last page (inside of the back cover) which is the 6" x 12" page.  Is the Princess's with their family.


Back Cover
And There Lived 2 Beautiful Princess's Happily Ever After.


I loved making this book,
A special thank you to my cousins
Jermery, Jen and Princess's Lily and Fiona. 

Materials used: DCWV Stack - Once Upon a time
assorted Prima Flowers
Bling was from Michaels Dollar Bins
chipboard and some fibers.